
In this tutorial, we will learn how to build a Spring Boot MVC web application using Spring MVC and Spring Data JPA.
We will be using the H2 in-memory database for storing the data.
Tools and Technologies Used
- Java 17+
- Spring boot 3+
- Spring framework 6+
- Spring Data JPA
- H2 Database
- Eclipse STS
Development Process
1. Create a Spring Boot Project
2. Create JPA Entity
3. Configure Database
4. Create JPA Repository
5. Create Spring MVC Controller
6. Create a Thymeleaf template
7. Run the Spring boot project
8. Demo
1. Create a Spring Boot Project
Use the below guide to create a Spring boot project in Eclipse STS IDE:-> Create Spring Boot Project in Spring Tool Suite [STS]
Make sure that you have added below Maven dependencies:
    <dependency>
      <groupId>org.springframework.boot</groupId>
      <artifactId>spring-boot-starter-data-jpa</artifactId>
    </dependency>
    <dependency>
      <groupId>org.springframework.boot</groupId>
      <artifactId>spring-boot-starter-web</artifactId>
    </dependency>

    <dependency>
      <groupId>com.h2database</groupId>
      <artifactId>h2</artifactId>
      <scope>runtime</scope>
    </dependency>
Create project structure as per the below screenshot:
2. Create JPA Entity
Let's create a User entity under the domain package and add the following content to it:
import jakarta.persistence.*;

@Entity
@Table(name = "users")
public class User {

	@Id
	@GeneratedValue(strategy = GenerationType.AUTO)
	private Integer id;

	@Column(name = "name")
	private String name;

	public User() {
	}

	public User(Integer id, String name) {
		this.id = id;
		this.name = name;
	}

	public Integer getId() {
		return id;
	}

	public void setId(Integer id) {
		this.id = id;
	}

	public String getName() {
		return name;
	}

	public void setName(String name) {
		this.name = name;
	}

}
3. Configure Database
Spring boot automatically configures database details for the H2 in-memory database so we do not need to explicitly add the database configuration in the application.properties file.
Let's add the following properties to the application.properties file:
logging.level.org.springframework=INFO

################### Hibernate Configuration ##########################
spring.jpa.hibernate.ddl-auto=update
spring.jpa.show-sql=true
SQL Script - Sample Data
Create a data.sql file under /resources folder and add the following content to it:
delete from users;

insert into users(id, name) values(1,'Admin');
insert into users(id, name) values(2,'Ram');
insert into users(id, name) values(3,'Krishna');
4. Create JPA Repository
Let's create a UserRepository for the User entity which gives CRUD database operations for the User:
import org.springframework.data.jpa.repository.JpaRepository;

public interface UserRepository extends JpaRepository<User, Integer>
{

}
5. Create Spring MVC Controller
Let's create UserController to handle HTTP GET requests and return a simple view ( Thymeleaf):
import org.springframework.beans.factory.annotation.Autowired;

import org.springframework.stereotype.Controller;
import org.springframework.ui.Model;
import org.springframework.web.bind.annotation.GetMapping;

import net.sourcecodeexamples.springboot.repositories.UserRepository;

/**
 * @author https://www.sourcecodeexamples.net/
 * HomeController handles HTTP Get request
 *
 */
@Controller
public class HomeController
{
	@Autowired UserRepository userRepository;

	@GetMapping("/")
	public String home(Model model)
	{
		model.addAttribute("users", userRepository.findAll());
		return "index";
	}
}
6. Create a Thymeleaf template
Let's create an index.html file under the /resources/templates folder and add the following content to it:
<!DOCTYPE html>
<html xmlns="http://www.w3.org/1999/xhtml"
	  xmlns:th="http://www.thymeleaf.org">
<head>
<meta charset="utf-8"/>
<title>Spring Boot Web App using Spring MVC and Spring Data JPA</title>
</head>
<body>
	<h1>Spring Boot Web App using Spring MVC and Spring Data JPA</h1>
	<hr />
	<table>
		<thead>
			<tr>
				<th>Id</th>
				<th>Name</th>
			</tr>
		</thead>
		<tbody>
			<tr th:each="user : ${users}">
				<td th:text="${user.id}">Id</td>
				<td th:text="${user.name}">Name</td>
			</tr>
		</tbody>
	</table>
</body>
</html>
7. Run the Spring boot project
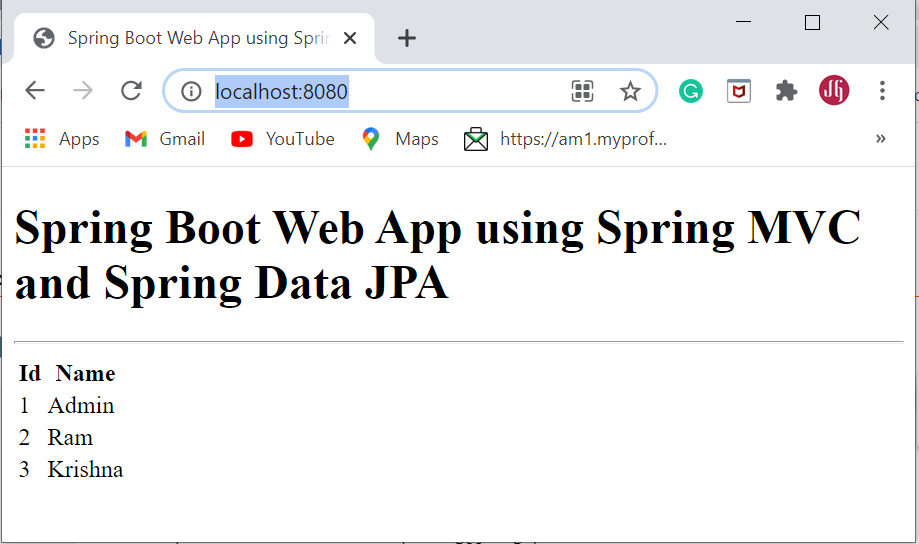
This is Spring Boot's main entity class. From your IDE, run the Application.main() method as a standalone Java class that will start the embedded Tomcat server on port 8080 and point the browser to http://localhost:8080/.
import org.springframework.boot.SpringApplication;
import org.springframework.boot.autoconfigure.SpringBootApplication;

@SpringBootApplication
public class Application
{
	public static void main(String[] args)
	{
		SpringApplication.run(Application.class, args);
	}
}
Or use the below command to run the Spring boot app:
$ mvn spring-boot:run8. Demo
Hit this URL in a browser: http://localhost:8080/
Comments
Post a Comment